Frequently Asked Questions
The following frequently asked questions will help you get the most out of your Columbia Print services. And of course, you can always contact us if you have any additional questions.
File Set-Up and Submission
Keep file and image sizes equal to your output size. Images need to be at a resolution of 300dpi or higher.
The short answer is yes. It is standard practice at Print Services to automatically convert to CMYK during proof conversion and generation.
This happens because our state-of-the-art color managed workflow automatically detects the ICC profile attached to your RGB file (if you have included one) and manages the color through the conversion process.
Changing from RGB to CMYK will always produce some color shifting and a reduction in the color gamut because it is impossible to reproduce the entire RGB color palette with an offset press. We recommend creating and submitting your document in CMYK to assure the color looks as close to your original file as possible.
If color accuracy is crucial, we recommend that you order a hard copy proof.
Dpi (dots per inch) is the number of pixels that fit horizontally and vertically into a one-inch square space. For an image to print properly it needs to be created with at least 300 dpi. You can't effectively increase the resolution after an image has been created. If you reset the resolution setting of a 72dpi image to 300dpi, the image will look blurry because it stretches out the pixels.
We accept the following file formats:
PDF (we recommend PDF X1a or Acrobat 1.3, which is version 4)
TIFF (flattened layers)
JPEG
EPS (with embedded fonts)
Print Services recommends PDF for the best results. This format combines the best color management and font management and leaves less room for error.
As an alternative we recommend EPS files with embedded fonts. EPS produces excellent results for documents that combine raster (images) with vector (text).
For an image file without text, a .tiff is an excellent format. When sending tiff files, be sure to either convert to CMYK or embed a color profile.
Design your piece with an extra 1/8-inch on all sides. For example, if your final piece will be a 4” x 6” postcard, create the file as 4.125” x 6.125” and the extra will be trimmed in the finishing process. Wherever you want color to run to the edge of the page, extend it beyond the size of your finished image, in this case beyond the 4" x 6" boundary.
The recommended file type is single multi-page PDF file. Use a software that is designed to create multiple-page documents such as QuarkXpress, Adobe Pagemaker, or Adobe InDesign, or use Acrobat Professional or similar program to merge single-page PDFs created from programs such as Adobe Photoshop, Adobe Illustrator, Freehand, etc.
Mechanicals, photographs, and art fully prepared for reproduction according to the technical requirements of the printing process being used. Also called finished art and reproduction copy.
Printed items require a higher resolution than items viewed on a screen. This resolution, 300dpi, is required for printed items. Computers are only able to display 72dpi on screen, so a 72dpi image may look okay when viewed at 100% on your monitor but it will print fuzzy. When zoomed in at 200% or higher, a picture that is displayed with 300dpi will look sharper than a picture displayed with 72dpi. Images saved for the web can be 72dpi.
- Go to "Share" in the editor menu bar, then select "Download"
- Under "File type," select "PDF Print"
- Tick the "Crop marks and bleed" checkbox
- Tick the "Flatten PDF" checkbox to optimize your PDF for printing
- Click "Download" to export your print-ready PDF
- For professional printing, consider selecting "CMYK" under "Color profile" (note: you will only be able to do this with a paid Canva account; free Canva accounts only allow RGB)
Choose File > New. In the window that pops up, set resolution as 300 and the units as pixels/inch.
Please note that you cannot use this technique to increase the total number of pixels in an existing image or document. If you change the resolution of an existing file, you must decrease the size so that the total width and height in pixels does not change.
We recommend that you export directly from the file menu and save as a PDF. Choose File > Export > select .pdf as the format > Save > Export.
For Microsoft Publisher, we recommend saving your file as a TIFF.
Go to File > Save As. In the Save As dialog box, select .tiff. (Tag Image File Format) as the file type, and click Save. Be sure to change the resolution from the default (150dpi) to Press Ready (300 dpi).
For Quark, we recommend you export directly from the file menu and save as a PDF. Go to File > Print > Save As PDF.
If you have Acrobat Distiller, we recommend that you print your files to the Adobe PDF print driver.
If you have any questions, give us a call.
Binding and Finishing
Print Services offers a wide range of binding options such as saddle stitching, perfect binding, plastic comb and spiral binding.
For a good example of perfect binding, look at a paperback book. In this type of binding, pages are cut and glued together along the spine, held together with the help of the cover which wraps around the booklet. When finished, perfect binding creates a flat spine, on which you can print text or graphics to fit.
For assistance with minimum and maximum page counts, and determining the size of the spine for your perfect-bound booklet, call a customer service representative.
Saddle stitching is how most magazines are bound, with staples along the spine. Saddle stitching is Ideal for projects with no more than 60 to 80 pages, depending on the weight of your paper stock. This is an economical binding method that allows pages to lie flat for reading. Because the pages are folded in half to create the spine, documents that you wish to be bound using saddle stitching must have a page count that is divisible by 4.
These types of binding are similar in appearance, but function a little differently. In both styles, pages are punched and an object is inserted in the holes to hold the booklet together.
Plastic comb binding uses a semi-rigid "comb" with teeth that fit through rectangular holes in the paper. This binding allows pages to lie flat on a hard surface for reading. The combs come in different colors and sizes for different looks and page counts.
Spiral binding uses a wire coil, fitted into round holes in the pages (think of a notebook). This option also allows pages to lie flat on a table or desk, and additionally allows pages to be comfortably folded around to be held in one hand.
Another kind of wire binding is called a "Wire-O," in which the wire forms teeth or double loops that fit into rectangular holes in the paper. The loops are crimped to hold the wire in place. This binding style also allows pages to lay flat.
A tri-fold is a popular type of folding pattern for brochures, flyers, and inserts where the printed material is divided into 3 sections of approximately the same dimensions and then folded along these lines into thirds, creating a 6-panel finished piece. Z-fold is a variation of a tri-fold.
A Z-fold or accordion fold is a tri-fold made by folding a page in equal parts in front of and behind itself, creating 6 panels. You can download our Z-fold template for further help.
A half-fold is another name for a simple fold. It is created by folding a page in half, creating 4 panels. You can download templates for half-folded brochures, flyers, and sales sheets by clicking on the templates link on each product page.
A gate-fold is created by folding the ends of a page inwards so that they meet towards the middle with a 1/8 inch gap. This creates a brochure with 6 panels.
A double gate-fold is created by folding the ends of a page inwards so that they meet towards the middle with a 1/8 inch gap, then folding the folded page in half in the same direction. This creates an 8 panel brochure.
The panels on the ends are slightly narrower so that they fit inside when folded.
Folding is available for Brochures, Flyers, Folded Postcards, Menus, Posters, Greeting Cards, Rack Cards and Sales Sheets. Not all folds are available for all products or all sizes.
Just ask a customer service representative if you have questions.
Color
Process color is a common shortened form of the term "four-color printing process." Process color (and similar terms) refers both to a method of reproducing colored images on printing presses and to the specific ink colors used, typically four inks. Other ways of referring to this printing process include "four color," "CMYK," "full process" and "full color."
Pantone refers to premixed ink, using the four inks to create a standard color. Pantone swatches are a worldwide standard of color identification among printing presses, and they are your best bet for confirming a definite color selection.
- Use a CMYK chart or Pantone book and enter the values in your design program that best match your desired color.
- Submit your files in CMYK color mode.
- Order a hard copy proof.
You can actually create a richer black by mixing other colors of ink with black ink on press than can be achieved by using black ink alone. The ideal mix for your CMYK calibration values are 60% Cyan (C), 40% Magenta (M), 40% Yellow (Y), and 100% Black (K).
CMYK is a color model used in offset color printing. It is based on mixing pigments of the following colors in order to make other colors:
C = cyan
M = magenta
Y = yellow
K = key (black)
Submitting your files in CMYK color mode will give you the best results. If you submit your files in RGB or any other color standard, they will be changed to CMYK by Print Services as part of the setup for printing. Please note that only half of the colors in RGB can be exactly matched in CMYK, so conversion will cause the colors to shift. If you are concerned about color and your job is color critical, please order a hard copy mail proof to ensure color accuracy.
If you have questions about setting up your file in the correct color mode, use one of the templates on this site or feel free to ask a customer service representative.
To convert to CMYK in InDesign, choose Window > Color to open the Color palette.
Select each object you want to convert and make sure the Color palette reflects CMYK values. Click the top arrow in the palette to change to CMYK, if necessary.
To convert to CMYK in Photoshop, choose Filter > Colors > Convert to CMYK.
To convert to CMYK in Publisher, choose Tools > Commercial Printing Tools > Color Printing and select Process colors (CMYK).
To convert to CMYK in Illustrator, choose Filter > Colors > Convert to CMYK.
To convert to CMYK in Pagemaker, choose Window > Show Colors. Double-click Colors in the palette. Select Model to be CMYK and Type to be Process.
To convert to CMYK in Quark, choose Edit > Edit Colors > Show Colors in Use > Highlight Color and click Edit. Change model to CMYK and deselect Spot color.
The short answer is yes. It is standard practice at Print Services to automatically convert to CMYK during proof conversion and generation.
This happens because our state-of-the-art color managed workflow automatically detects the ICC profile attached to your RGB file (if you have included one) and manages the color through the conversion process.
Changing from RGB to CMYK will always produce some color shifting and a reduction in the color gamut because it is impossible to reproduce the entire RGB color palette with an offset press. We recommend creating and submitting your document in CMYK to assure the color looks as close to your original file as possible.
If color accuracy is crucial, we recommend that you order a hard copy proof.
For Photoshop, we recommend saving it as a TIFF if it doesn’t have any text in the file, image only. Go to File > Save As. In the Save As dialog box, select .tiff. (Tag Image File Format) as the file type, and click Save. Be sure to change the resolution from the default (150dpi) to Press Ready (300 dpi).
If the file has text elements, we suggest saving as a PDF. Go to File > Save As. In the Save As dialog box, select .pdf as the file type, and click Save.
Embossing uses a die (a solid pattern or stamp) to mold the paper into a raised or lowered pattern. This technique adds texture to a printed piece.
Foil stamping is a way to add color and flash to your document in addition to standard inks. In this process, a sculpted metal stamp is used to adhere metallic leaf, using heat and pressure, to the paper. This results in a shiny, eye-catching design with some physical texture.
Copier Program
Ricoh and Canon digital copiers, Ricoh Aficio (except the 350, 400 and 401models) and Canon IR series, are being serviced and supplied by Ricoh.
Ricoh and Canon analog machines (all other model series) are now obsolete and no longer covered under the maintenance contract program.
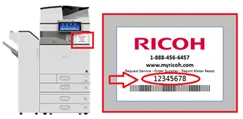
Our equipment maintenance contracts include supplies (except paper, staples and supply shipping rush fees) at no additional cost. To order supplies, look for a sticker affixed to your copier with the service phone # and your *equipment ID#.
Canon/Ricoh copiers call: 888-456-6457
Most of our equipment maintenance contracts include supplies (except paper and staples) at no additional cost, so there is no need to pay for these supplies through Republic.
*Look here to find your 8 digit equipment ID number
1) If you are requesting a new copier, complete the section on bottom of the quote sheet you receive from your customer service representative. They will arrange for removal of your old copier in conjunction with the delivery of your new one. Please Note: This section must be completed if an existing copier/asset is being returned.
2) If you want to have a copier that you own removed, and you are not requesting a new copier, please email the copier's serial # and location to [email protected] to arrange removal.
Canon Copiers: Click the “Counter Check” button.
Ricoh Copiers: Click the “User Tools/Counter”, then Click the “Counter” button.
Please send an email to [email protected](link sends e-mail) or call 212-854-3233 letting them know that one of your machines has been removed or replaced. Make sure you provide the final meter read, date of removal, and your phone number in the message.
If a machine is missing from your list, please send an email to [email protected] or call 212-854-3233. Make sure you provide your phone number so a Customer Service representative can call you back.
We centralized the purchasing, leasing and servicing of copiers in order to obtain beneficial volume discounts and service for our customers. This centralization included converting to a single-payer system for all equipment acquisition/lease, maintenance and supplies costs.
The University only enters into lease agreements with Lessor(s) with whom there is a vetted and approved Master Lease Agreement (MLA) on file in the Central Purchasing office
Lease Signing Authority
The authority to enter into and sign a capital lease agreement on behalf of the University is specific to University officers who have been duly authorized and or delegated by the University's Board of Trustees to enter into lease agreements. Currently only the Vice President for Central Purchasing is authorized to sign capital lease documents on behalf of the University. NO Department Administrator, School Administrator, Physician, Manager, Chair or Administrative Personnel are authorized to sign any lease documents (such as a quote, proposal, schedule, lease agreement, etc. provided by a Lessor or Vendor).
Photocopier/Multi-Function Device Procurement Policy: http://policylibrary.columbia.edu/files/policylib/imce_shared/PhotocopierPolicy.pdf
Benefits of our Centralized Copier Program with Ricoh
- Centralization of the acquisition process through one dept (Print Services) for improved asset tracking
- Technicians on-site at Columbia to improve response time and reduce system downtime
- Minimize the # of purchase orders processed through Purchasing (significant dollar savings annually)
- Minimize the # of invoices processed through Accounts Payable (significant dollar savings annually)
- Minimize the # of change orders processed through Purchasing (significant dollar savings annually)
- Reduction in individual department acquisitions to better leverage spend and procure standardized photocopier systems for improved serviceability
- Improve efficiency for University Finance to view photocopier expenses more clearly across the University
- Monthly maintenance billing. Maintenance was previously billed annually which caused excessive estimations by vendors. The accuracy achieved with the monthly billing practice has provided significant cost savings
- We are also becoming "Green" friendly so through centralization efficiencies we can reduce paper utilization and provide maintenance on equipment to keep them energy efficient
Other Ricoh benefits include:
- No late fees on monthly lease payments. Some vendors bill as short as Net/15 causing massive late fee debt for the university (recurring savings of thousands of dollars annually)
- Ricoh does not charge copier termination fees at lease end.
- Ricoh contractually has 4 hour service response time for copier maintenance.
- No pickup fees when returning copiers which in some cases we've seen as high as $850
- The Ricoh line of products is generally rated at the top of the buyer ratings.
It is important to mention that all vendors had the opportunity to participate in the previous RFP conducted including suppliers such as Northern Business-NBS, Canon Business-CBS, Ricoh Business-RBS, Xerox, Oce and others. The University team tasked with reviewing and providing recommendations based on submission and presentations concluded that Ricoh provided a solid value-added proposal coupled with a deep product line and a solid service plan. Ricoh has remained a committed partner to Columbia and the agreement is regularly reviewed to maintain market competitiveness and appropriate service levels.
Also, the University Electronic Document Management (EDM) and Data Security initiatives are prime examples of leveraging our partnership with Ricoh to meet the needs of our schools and departments and to ensure they will be able to take advantage of these systems.
In our ongoing effort to be sustainable, Columbia Print is no longer printing copier charge statements. To review your monthly charges, go to ARC FDS Reporting to see charges in the “Transaction Description/Vendor Name” column. Charges for copier maintenance are debited to account #63290 and charges for copier lease fees are debited to account #63293. For more information, please contact us at [email protected].
We participate in Ricoh's Toner Container Return Box Program. Returned cartridges are sorted for parts reuse, material, and energy recovery. None of the returned materials end up in a landfill. To participate, simply use your own carton box and print a pre-paid return label from www.ricoh-usa.com/recycling.
Copier Wiping Program
Currently photocopiers include small hard drives that allow for the retention of “data at rest”, in order to allow for photocopying or print jobs to stay in a queue. Hard Drive Wiping Software clears data as print jobs are completed. Data is no longer stored on the machine’s hard drive.
It's instantaneous.
30 - 90 minutes.
Columbia Print offers centralized purchasing, leasing, and servicing of copiers through our partner, Ricoh. We will provide you with an assessment and estimate before transferring you to the program. We will also ensure that your old equipment is disposed of and wiped properly.
Even if your machine is slated for an upgrade soon, we advise you to install HD wiping software on your outgoing copier.
- If your copier is owned, Print Services will IDI as one time charge to the FAS acct # associated with your copier.
- If your copier is leased, Print Services will distribute costs via IDI over the balance of the lease term to the FAS acct # associated with your copier.
Mail Services
Yes, we offer complete printing and mailing solutions and can affix the indicia for you.
Normally 2 to 3 days depending on the size and scope of the mailing.
7 to 10 days.
2 to 3 days.
To mail a piece First Class costs $0.44 for the first 1 oz and $0.17 for each additional oz.
Mailing Services can send your letter-sized piece, up to 3 oz, for as little $.172 using the Non-Profit indicia.
Paper
Paper with a coating of clay and other substances that improves reflectivity and ink holdout. Mills produce coated paper in four major categories: cast, gloss, dull and matte.
Paper that has not been coated with clay. It has a soft look and feel. Also called offset paper. It is good for posters or flyers displayed near a lot of light because it doesn't cause a glare or reflection.
SFI, Sustainable Forestry Initiative, is one of the third party certification programs that require a chain of custody process and yearly audits of participating parties, harvesters, mills, merchants, and printers. Specifically the examine:
- sustainable forestry practices
- worker's rights
- labeling claims
FSC, Forest Stewardship Council, is the most recognized third party certification, which requires a chain of custody process and yearly audits of participating parties, harvesters, mills, merchants and printers. Specifically the FSC monitors fiber (pulp) sourcing activities including:
- Sustainable forestry practices,
- high value forest conservation,
- historical or indigenous land,
- clear cutting,
- GMO's and plantations
A ream of paper is 500 sheets of paper.
Print Services does offer a wide-range of acid-free paper options. Made from pulp containing little or no acid so it resists deterioration from age. Also known as archival paper.
As standard practice, we use 100% recycled paper for black and white copies. All other requests are also available with 100% recycled paper. Ask us for more information about our sustainable options.
Terminology
The size of the printed material in its finished stage (e.g., the finished trim size is 5 1\2" x 8 1\2").
OCR (Optical Character Recognition) -- A scanned document is stored as an image. The text is not recognized beyond being a readable picture of the page. OCR is the process that produces text from that scanned image. OCR makes a document's text searchable. The OCR text file can be edited or re-used in a word processing program, which saves re-keying time. Accuracy of the OCR process is generally close to 99.995%, but can vary depending on the quality of the paper document and the font size.
test sheet made to reveal errors or flaws, predict results on press and record how a printing job is intended to appear when finished.
Camera work, color separations, stripping, platemaking, and other functions performed by the printer, separator, or a service bureau prior to printing. Also called preparation.
Short for picture element, it is a dot made by a computer, scanner, or other digital device. Many pixels together make up the image you see. Also called pel.
The unit of measurement for paper weight (grams per square meter).
To cut irregular shapes in paper or paperboard using a die.